
Okay Everyone, listen up and hear me well. No more shall we subject our palates to dry, overcooked, rubbery skinned, store bought, pre-roasted chicken! Yes, I know that picking one up on the way home from work is easy, but one bite of that sad, bland, mealy meat is enough to make you wish for pizza delivery instead. I know roasting a chicken can be intimidating, but I am here to assuage your fears and guide you, step by step, to the comfort that can be found in a beautifully roasted, whole chicken in your home kitchen. Chicken bliss has never been so easy to attain!
Before we begin, if you do not yet own a reliable meat thermometer, get thee to a Target ASAP or order one from Amazon! A thermometer is the only way to properly gauge the doneness of meat and ensure it cooks to 165 degrees every single time. I know many of you have been told that chicken is done when sliced meat is no longer pink. I hate to break it to you, but that fable is simply an inaccurate statement that leads to overcooked, dry jerky. Sometimes, a pinkish hue will remain throughout the cooking process and won’t go away no matter how long you cook the bird.
I have experimented with numerous meat thermometers throughout my poultry cooking trials and there are widely varying options available at all price points. You can get all fancy-smancy and use this wireless digital meat thermometer with the probe that stays in the meat the entire time you are cooking. Just set the desired temp, pop in the oven, and wait for the beep. Very convenient. Or you can go old school with a standard insta-read cooking thermometer
. While you definitely don’t want to leave it in the bird throughout the cooking process like the previous thermometer (The insta-read will melt in the oven, I promise…), you periodically use it to take the temp toward the end of your estimated cooking time. Whichever version you choose, just pick one. Cooking the meat to the appropriate temperature (165 degrees) will ensure all harmful bacteria are eliminated and leave you with juicy, flavorful meat you can’t wait to share with your loved ones.
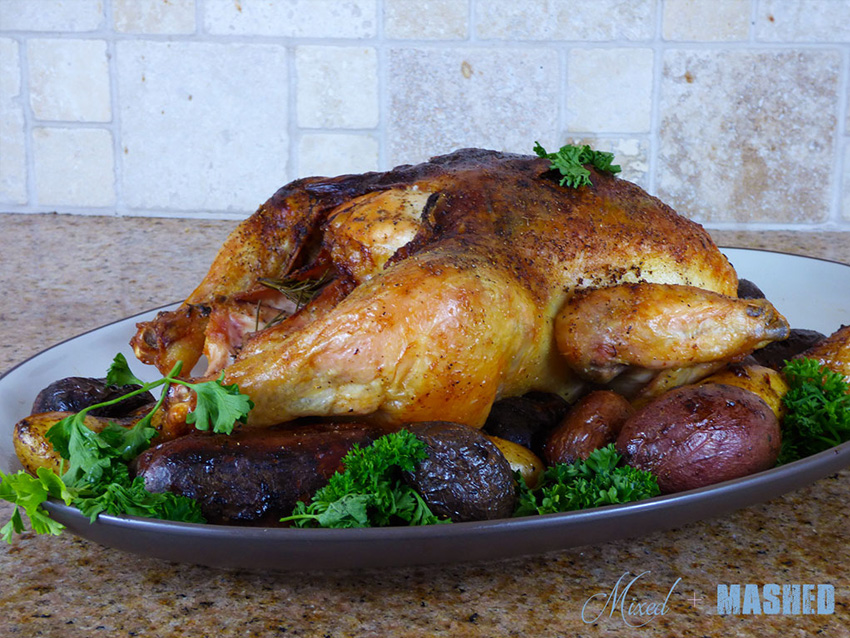
Roasted Chicken with Fingerling Potatoes
Ingredients:
- 1 whole chicken (usually around 5 lbs)
- ½ stick softened butter
- Coarse Kosher salt
- Cracked pepper
- Garlic powder
- Onion powder
- 3 sprigs of fresh rosemary
- A handful of fresh thyme still on the stem
- 1 lemon – half thinly sliced, half intact
- Fingerling potatoes
Directions:
Preheat your oven to 400 degrees.
Pat the chicken completely dry with paper towels. Carefully separate the skin from the flesh with your fingers.
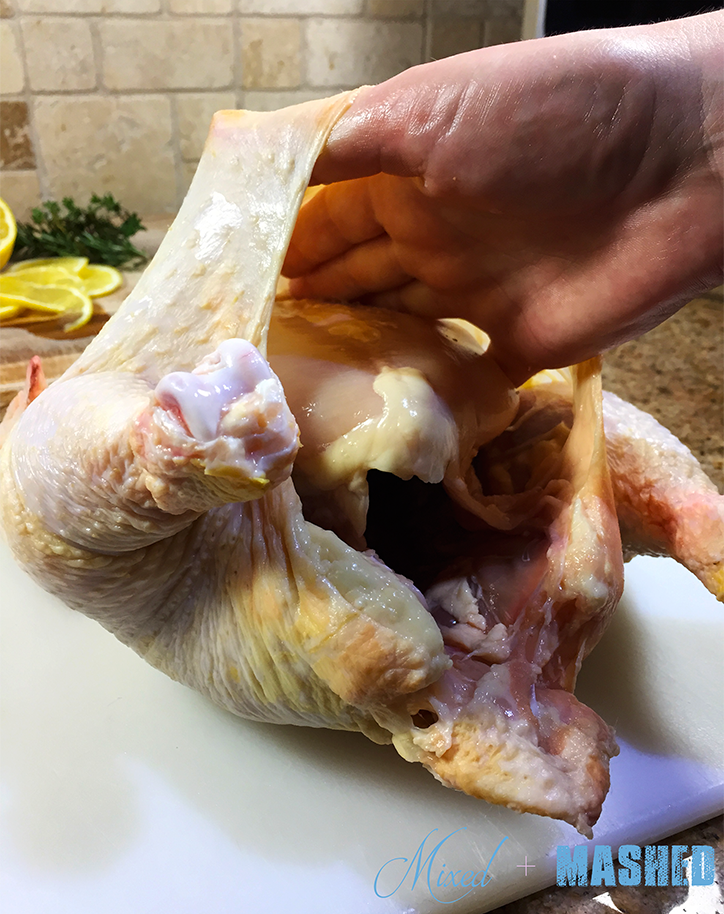
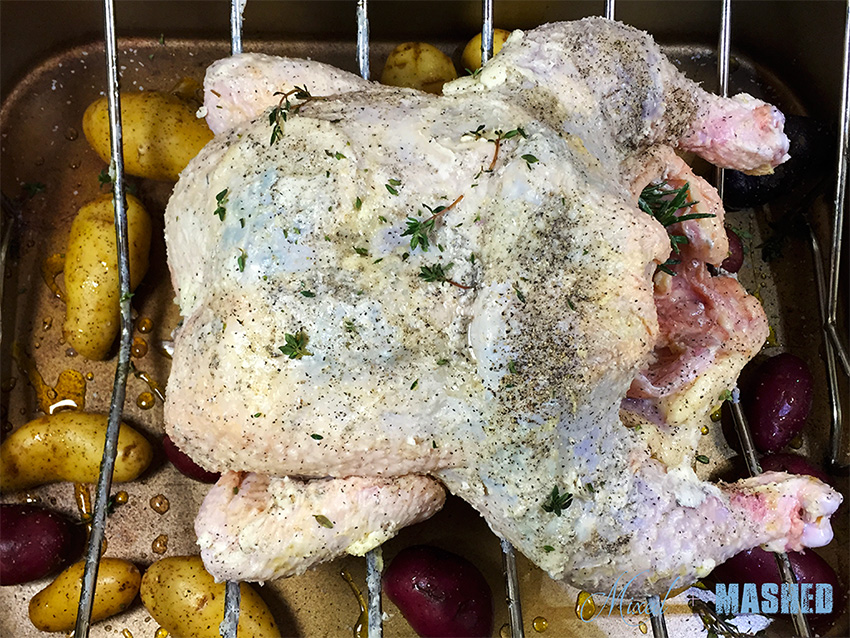
Using your hands, spread the softened butter underneath the skin and all over the exterior of the bird. Liberally season the entire bird with salt, pepper, garlic powder and onion powder, making sure to get underneath the skin. Arrange the lemon slices underneath the skin so that they aren’t overlapping and place a spring of rosemary and a few sprigs of thyme on top of the lemon.

Place the prepared bird in a deep roasting pan with a rack in the middle and tuck the wings underneath the body. Squeeze half a lemon all over the bird and place it in the cavity, along with 2 sprigs of rosemary, some thyme and any remaining lemon slices. Now go wash your hands to rid them of the chicken-y, butter sludge because you are done handling raw poultry!
Arrange the potatoes around the bottom of the pan and place in the oven. Walk over the fridge and go pour yourself a nice glass of wine while you wait for the oven to work its magic – you deserve it!
Cook the bird until the internal temperature reaches 165 degrees (approximately 20 minutes per pound). (Check the bird mid-way through cooking to determine if the skin is browning too quickly. If it is, loosely tent with foil and return to the oven.)
When the internal temperature reaches 165 degrees, remove from oven and allow for rest for 15 minutes before carving. This allows the juices to redistribute throughout the meat and prevents dry, tasteless chicken. After 15 minutes, transfer your chicken to a carving board. If you need pointers on carving, check out these handy tips from Southern Living’s website.
Last but not least, attend to the potatoes. Using your spatula, move them all around the bottom of the pan to coat them in the yummy juices and melted butter. Generously sprinkle salt, fresh cracked pepper, and fresh thyme on top. Serve alongside the chicken and with a dollop of sour cream if desired. Make sure to eat the lemon slices that cooked with the bird underneath the skin – they are delicious!!
PS…Save the chicken carcass in a plastic baggie and store in the fridge after you have removed all of the yummy meat. I’ll post a recipe tomorrow on how to make chicken stock from scratch.


3 comments
Well I have managed to screw this receipe up twice but I will keep trying. I think my lemons are to lemony.
Oh no, Harley! What are you finding too tart? Is it the juice all over the bird or the slices under the skin? My initial thought would be to switch to Meyer lemons since they tend to be a little sweeter than other varieties if the problem is the juice all over. If it’s the lemon under the skin, I recommend slicing them as thin as possible and to increase the amount of salt that comes in contact with the slices. That should temper some of the bite. Let me know if that helps!
I usually just grab some lemons off the neighbor’s tree. I will try and find some Meyer’s lemons instead of stolen ones.